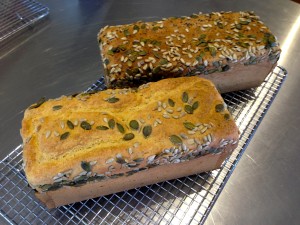
Gluten Free Bread
Author: Gina @ The Passionate Pantry
Prep time:
Cook time:
Total time:
Serves: 1 loaf

Ingredients
- 110g basmati rice
- 110g brown rice
- 80g whole millet seeds / or buckwheat kernels
- 40g quinoa seeds (I use white)
- 140g arrowroot flour
- 20g sunflower seeds
- 20g pepitas
- 2 tsp Guar Gum (level), or 2 tbls powdered psyllium
- 1 sachet dry yeast
- 1 tsp fine sea salt
- 400g filtered water
- 30g olive oil
- 1 tbls apple cider vinegar
- 30g honey
- 2 x 59g large eggs
Instructions
- Line bread tin with baking paper (base measurement 22cm x 9cm), ensuring that you have two ends extending beyond the tin to allow for easy removal of loaf when it is baked, put aside
- Add the basmati, brown rice, millet or buckwheat, and quinoa seeds to your bowl and mill 1 minute x speed 9.
- Add the arrowroot flour, sunflower seeds, pepitas, Guar Gum or powdered psyllium, dry yeast and salt and mix 15 seconds x speed 4
- Remove mix from bowl
- Do not clean bowl
- Add water, olive oil, apple cider vinegar and honey to TM bowl and heat 3 minutes x 50 x speed 1
- Return dry ingredients to TM bowl, place eggs on top and mix 15 seconds x speed 5
- The mix will look like a paste
- Pour mix into loaf tin and flatten top evenly with spatula
- Sprinkle top with seeds if desired, and put aside for 20 minutes in a warm spot to start rising
- Time will depend on where the loaf is placed, but you want the mix to rise up to 2 cms of the top of the tin
- Set your timer for 20 minutes so that you don’t forget to check the bread, turn your oven to 180 degrees (fan forced), place rack into middle of oven, and get your cooling rack with a fresh tea towel draped across it ready for when the bread is baked
- Check your bread after 20 minutes and reset timer if it still needs to rise further
- Once risen, place loaf in oven and bake for 40 minutes … check with skewer for doneness
- Remove from oven and place onto tea towel sitting on the cooling tray
- Set timer for 10 minutes
- After 10 minutes, remove bread from baking tin using baking paper to assist in doing this
- Place the bread (with the baking paper still around it) onto tea towel and wrap tea towel loosely around bread and leave to cool completely before cutting or storing
Notes
This bread is particularly delicious toasted in a sandwich toaster … it goes crispy on the outside (which I think it due to the rice) and beautiful and soft on the inside. Great topped with labne or fresh ricotta, berries and maple syrup for an alternative to French toast … in fact, this combination is delicious!
The bread keeps relatively well in a sealed bag in the pantry for two to three days. What is not used can be sliced into thick pieces and frozen in individual snap lock bags, and taken out of the freezer as you need them. Once frozen the bread is better toasted. Makes great bread crumbs to use in cooking (i.e. meatloaf), or as topping on baked dishes (i.e. veggie bake), or as a coating on meat like chicken breasts.
I know many people do not like to use gums of any kind in their cooking and I totally respect that. However, I have tried using alternatives in this recipe without success, so I use Guar Gum as I get good results with it, I can get it in the organic range, and I prefer it to other gums as it is derived from a plant.
RECIPE UPDATE APRIL 2020:
I have just retested this recipe replacing the guar gum with 2 tbls of powdered psyllium and it is perfect ... everything else in the recipe remains the same. If you can only buy psyllium husk, then mill it in the Thermomix by placing 50g in the ™ bowl and milling 10 seconds / speed 10. Use 2 tbls in this recipe, adding it when you would the guar gum, and keep the balance in a container in the fridge to use for your next loaf.
Recipe by The Passionate Pantry at https://www.thepassionatepantry.com.au/gluten-free-bread/